• Skip to primary navigation
  • Skip to main content
  • Skip to primary sidebar

Quilt As You Go, Simply Done

Simply Done

  • Home
  • Crazy Shortcut Quilts
  • Finish Any Quilt
  • Tee Shirt Quilts – Quilt As You Go
  • Modern Quilts
  • Crazy Shortcake
  • The Authors
  • Comfort
  • Marguerita’s Blog
  • Finished Quilts!
  • Our Quilt Videos
  • Favorite Tools
  • Newsletter

Marguerita’s Blog

Face Masks for Michelle

April 10, 2020 by Marguerita

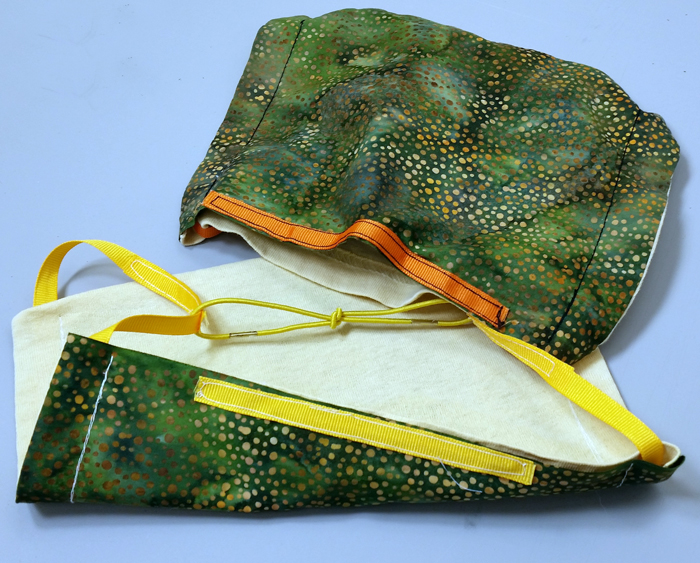
I made two masks for a friend who doesn’t have a sewing machine or any materials to make one with. She chose the fabrics from an image I sent her in chat.

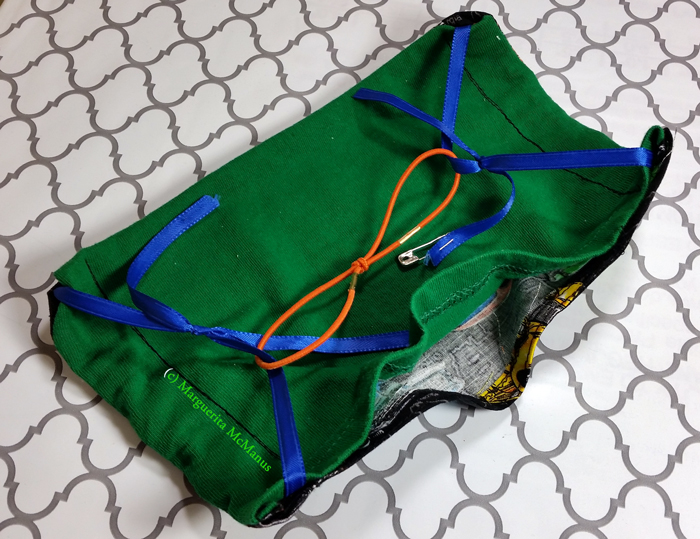
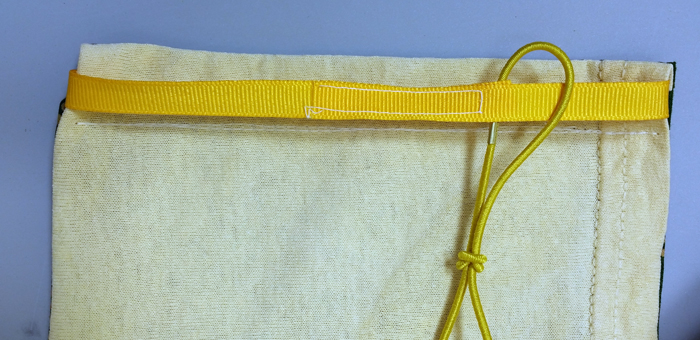
I learned as I went and discovered that the grosgrain ribbon is a bit stiff and if only knotted, comes undone in either the washing machine or the dryer.

After hunting all the parts down I put the ribbon back through the mask and then sewed it to itself after threading through the elastics.

Because I used a combination of batik fabric and well starched t-shirt, there was no shrinkage in the wash. The nose piece held up well also. I’m happy with this design and will continue to use it with either ponytail elastics or elastic cording, when I can buy some.

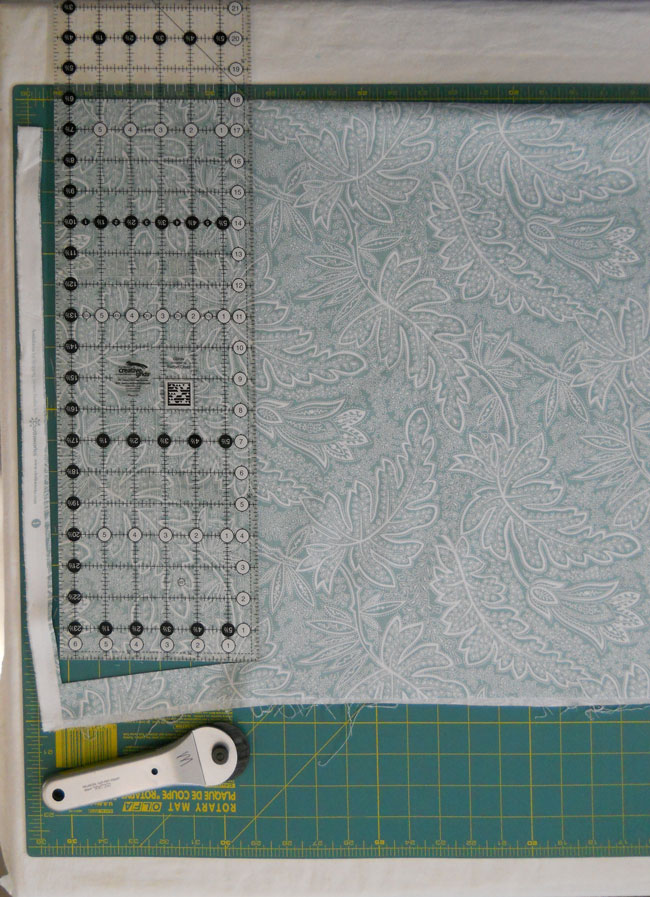
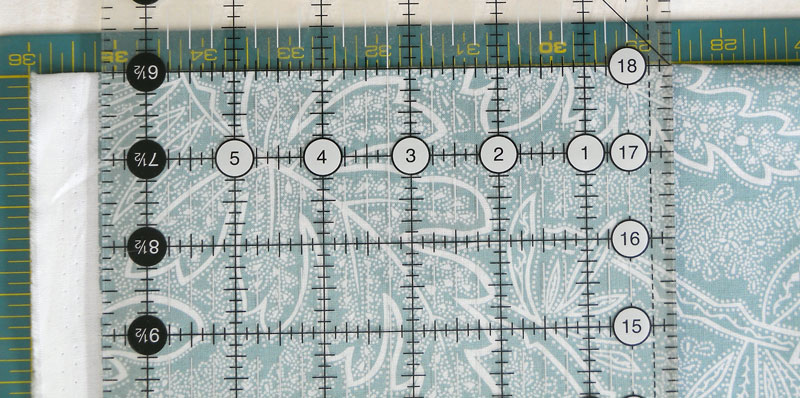
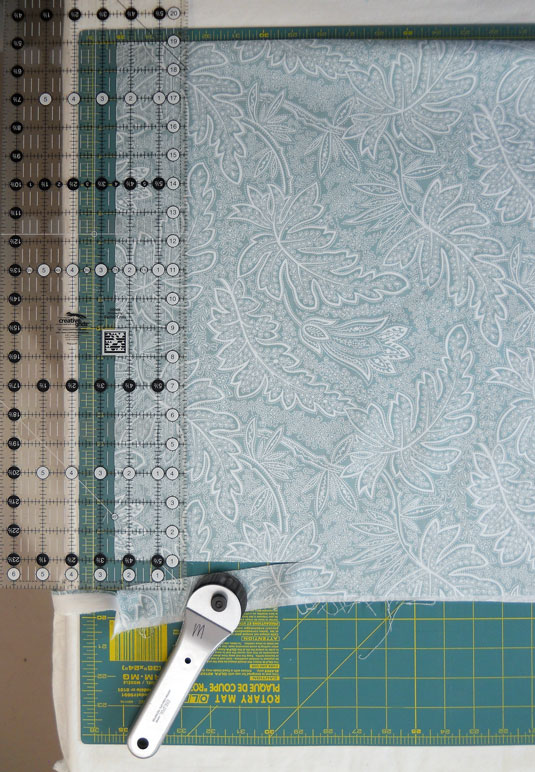
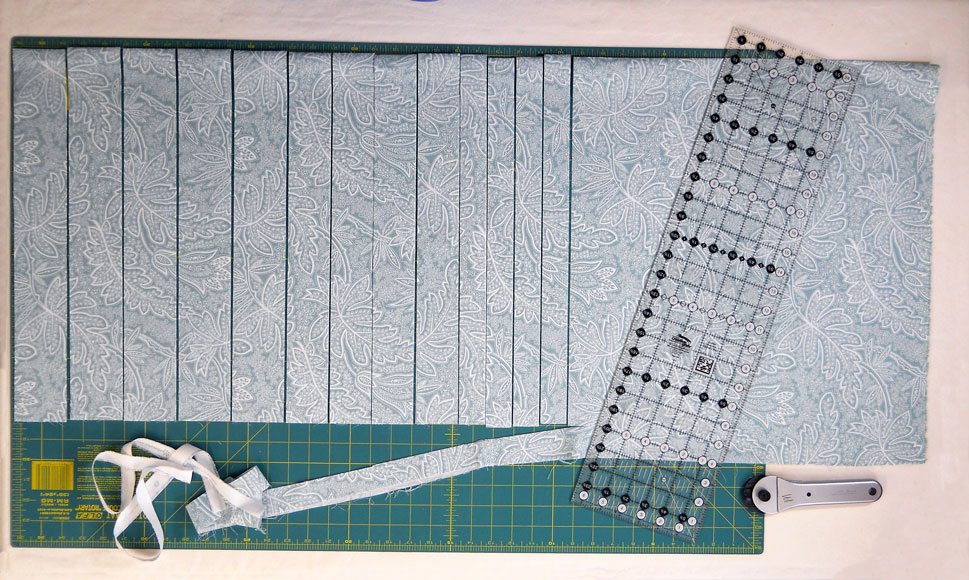
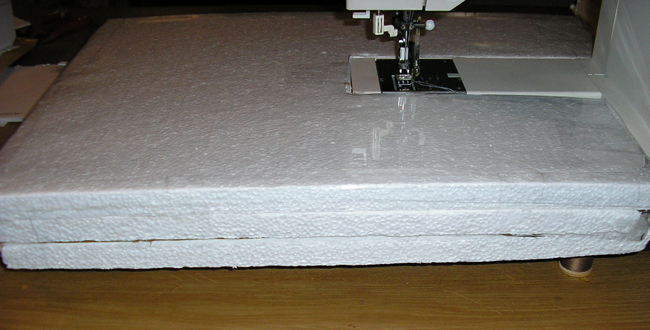
Here’s my tutorial for a Home Use Fabric Mask –

DIY Fabric Face Mask with Ribbon and Nose Piece

Filed Under: Face Mask Tagged With: Batik Face Mask, Elastic, Face Mask, Ribbon, T-Shirt Face Mask

Experienced Mask Wearer

April 8, 2020 by Marguerita

Tom and I train annually for how to respond to the next oil spill in Alaska. Part of that training is how to wear – meaning put on, use carefully and safely remove – protective outerwear. We suit up, glove up, mask up and have chocolate syrup poured over us, then have to take it off without contaminating ourselves.

It’s not easy.

Protecting yourself against something you can’t even see is tremendously more difficult.

That’s why I designed the best possible homemade Home Use mask I could and I want people to understand it.

Outer fabric is tight weave quilting cotton or batik. The pocket is for additional filtration, like a section of blue shop towel. Inner layer is something soft against your face.

EASY ON OFF IS CRITICAL FOR NON-CONTAMINATION. Yes, I am shouting that. All the masks in the world won’t protect you if you take it off wrong and contaminate yourself. Go ahead, try it with syrup – any kind – on your mask. Learn how to do it right.

Here’s my tutorial on how to make the mask for Home Use and below that how to take it off properly – https://www.crazyshortcutquilts.com/diy-face-mask-with-ribbon/

Filed Under: Face Mask Tagged With: Face Mask, PPE, Remove Face Mask

Rotary Cutting Fabric – The Right Way

May 7, 2019 by Marguerita

Hi Quilters, if you struggle putting your traditional quilt blocks together and having seams match (not our crazy cutting methods) I may have the tip you need: it all starts with cutting and I’ve made a video about it – posted below.

I have seen two big mistakes that quilters make – new and experienced quilters – and they are at the most basic level of quiltmaking: cutting and pressing.

This topic is about rotary cutting fabric accurately so that your quilt pieces are all the same size and they come together easily and perfectly. The trick is using your ruler and cutting mat the right way.

The lines on any cutting mat, and on poorly made rulers, are not accurate enough for precise cutting. Lately wherever I go – guilds, quilting with friends, or even watching videos – I see quilters using their mat as a guide for cutting, which is a huge mistake.

The markings on a well made ruler are the best guide for cutting.

Here’s an example from a recent quilt I made where I needed 36″ long strips of different widths.

To cut the strips, first I trimmed off the selvage edge, on the left, aligning the markings of the ruler with the fabric fold. I didn’t use any of the lines on the mat at all to do this. Then, to make all the strips the same length, I trimmed off the bottom (raw) edge by putting the ruler on the fabric at the length I wanted: 36″. Since the fabric is folded in half I used the 18″ mark on the ruler.

The ruler is aligned to the fold of fabric on the 18″ line to give me 36″ long strips.
The only marking that matters here is the 18″ line on the ruler, aligned with the fold.

Now that the length is cut I can adjust the ruler down one inch to give me plenty of room for making my cuts. I aligned the ruler with the 19″ mark on the fold and aligned the long edge of the fabric with the 2.5″ mark on the ruler to make my first cut.

The left edge is straight, length is exact, now I can cut my strips to the desired widths, using the markings on the ruler, not the mat.

I continue to move the ruler to the right, on top of the fabric, cutting the width of strips needed for my project: 5 strips @ 2.5″ wide, 4 strips @2″ wide and 4 strips at 1.25″ wide. As I moved the ruler I continued to measure and cut the length of the strips using the 18″ mark along the fold of the fabric.

This method is fast and extremely accurate and once you try it, very easy.

Here’s the real test – put your ruler on your mat and look at the markings on both. You may be in for quite a surprise!

Here’s the video I made about cutting fabric using your ruler, not the mat.

Let me know what you think! My next project will be a demo on pressing – the second most common mistake I see quilters make.

I hope this helps you. Wishing you happy quilting, Marguerita

Filed Under: Sewing and Quilting Tips

Edith’s Custom Quilting Table

June 24, 2018 by Marguerita

Edith sent me a long note and several pics of her table – she’s thrilled! Here’s what she shared:

I wanted to send you a thank you note. Recently I was all ready to buy a very expensive sewing table – it was 30% off, but still more than I wanted to pay!! Like $1600!!! Fortunately for me, they asked me to measure the width of my door before they delivered, and we discovered that it wouldn’t fit. Solution to that problem of lost money LOL.

I was on YouTube looking for videos about how to put together the three layers of my quilt without getting on the floor, and came across your video for making a “cheap” quilting table. Hallelujah. In three days I had bought the insulation and cut it to size, Had put my quilt together (and not on the floor!) and was sewing it on this fabulous set up. $40 for the insulation and I already had the table. Fortunately I have a drop in bobbin on my machine so I didn’t have to cut out the insulation for that. I really needed 3 1/2 inches thickness and I used to pieces of the two inch just because it’s what I had, so I trimmed it down around the free arm and it’s working pretty well.

For the first time I am sewing without a sore back, without sore shoulders, without tired arms! I’ve used several of your videos and saw what you showed about the ergonomics and it’s made a world of difference. Sometimes though I loved sewing and I love the finished products, I don’t love the almost torture to my back. This has solved that!!! Bonus!!

Put me on your list of testimonials! I am very happy I came across your YouTube videos. I will attach pictures. And by the way the quilt is being made for my six-year-old grandson from shirts of his dad, his granddads, and even one of his great grandfathers. It’s not perfect and I really don’t care about that LOL. It’s as good as anything I’ve ever done and I’m enjoying making it!!

You’ve really been a big help! Thank you so much and keep up the good work. I will continue to follow you for ideas!

Edith
Manchaca, Texas

Filed Under: comfort, Ergonomics, quilting table

Simply Charming Quilt From Janice

May 19, 2018 by Marguerita

I just received the pic below from Janice, and then I went digging for any emails we have shared. They go back to 2012! We started talking about the batting requirements in the Kindle version of our first book Crazy Shortcut Quilts. Then we moved onto how we each make homemade starch, and then the sizing for Simply Charming from our book Quilt As You Go {reimagined}. Janice wanted to make the quilt in a queen size and wanted help with the fabric calculations. Here’s her quilt, isn’t it gorgeous!

Simply Charming Quilt

Filed Under: Crazy Shortcut Quilts Book, Modern Quilt As You Go, Quilt As You Go

WillieMae’s Quilting Table Story

February 2, 2018 by Marguerita

My favorite kind of email!

Good morning,

I want to thank you for your video and sharing with us how you made your table. I decided to make me one. I use a Pfaff machine and the machine sits on it’s own platform which sits on the table. After making the extended table it still needed some support, so I used short spool of thread/with or without the thread as legs.

Well, here is my little creation. I didn’t get the kind of foam you got. I did see something I think was like what you have but, it was so big and tall and I’m not 5 feet so it would have been not easy for me to handle, even though they said they would cut it. So what I got was a package of 6 sheets 14 1/2 wide.about 48 long and 3/4 in wide.I cut 3 layers and glued them together. Then I put the plastic on and had to tape some of it down. I’m a little disappointed that the fabric does not slide across the table like I thought it would. However I’m still new at this. All in all I like my table and I’m sure I’ll get better as time goes on.

Thanks, WillieMae

I love that WillieMae adapted what I did to meet her needs, using what was best for her. That’s the whole idea, to open your mind to see materials and resources in a way that solves your problem!

Filed Under: comfort, Ergonomics, sewing and quilting videos

Gina’s New Quilting Table

January 23, 2018 by Marguerita

I love stories about solving a problem based on my ideas and Gina sent me her wonderful creation and some super pics!

Just thought I’d drop you a line and show you my very recent new sewing room I feel blessed to have. We recently moved from a 1 bedroom condo to a 2 bed room house, this room was formerly a TV room which I confiscated. As you can see I found plenty of things to put in it. The home belonged to my in-laws who recently moved to assisted living. One of the pics shows a Needle Book, from long ago I thought was so appropriate for the room that my mother in law had kept along with the thread box, and a very old toy spinning wheel.

Enough background…lol…anyway, I found the table at Walmart at for about 35.00. It works perfectly and is about 4 inches shorter than I was using previously(the white table behind my chair in the corner). The coffee table in front of the machine I use in so many ways and lifts so I can use it as a cutting table or for ironing quilt backings. I recently created the design/basting wall but haven’t tried it out on a quilt yet. My main reason for it was to keep off the floor on my knees but not sure how well I will do on chair either for larger quilts. Anyway, I hope this finds you well and thank you so much for sharing your time to create these videos, I use my table at the 24″ setting which is perfect and has saved me so much pain in my shoulders and neck the other table was 29″ and is being used for other sewing needs.

It is my little room of happiness, everything melts away when I’m in there, my kitty even sits in my rocker after several scoldings about being on the quilt I’m working on at that time.

I have neck issues and was told by my neurosurgeon that after looking down for years and years doing whatever it is I’ve been doing it has taken a toll on my body. I had wanted to get a table a long time ago but didn’t since I didn’t really have the room to set up anyway, so when we moved I remembered seeing your video previously and finally did it! Anyway thanks again for all your devotion to helping others feel better!! Have a great day!!!

Gina!!

Filed Under: comfort, Ergonomics, quilting table

Sarah’s Quilt

January 13, 2018 by Marguerita

Sarah Henderson sent me the story about her quilt and a couple of pics and I LOVE it!

Here’s her story:

I wanted to share a picture of my completed Crazy quilt.
Thanks so much for your inspiration, I loved every moment of creating this. I had so.much fun with this. What a great introduction to crazy quilting. I don’t want to do anything else now.
ps Thanks again for your inspiration!

Filed Under: Crazy Shortcut Quilts Book, Decorative Stitches, Quilt As You Go

Nancy’s Quilt

May 26, 2017 by Marguerita

Nancy just sent me a photo of her finished quilt! Here’s what she wrote:

Hi Marguerita,
A few months back you helped me when I was in a panic over having made my blocks too large. After much thinking, figuring and praying, I took a deep breath and did some trimming. Everything turned out to my liking.

We are in AK right now and have given this to our grandson for graduation from Colony High School in Palmer.

Your books were a tremendous help and I followed the directions so carefully. I added arrows to the tags to further clarify whether the block was a center or side, top or bottom edge block.

Thank you.
Nancy Ballantyne
Gilbertsville, PA

Here are Nancy’s blocks before adding the borders to each block. She had these blocks left over from another project and wanted to make them into a quilt. She was working from my book Finish (almost) Any Quilt with Quilt As You Go. I think she made an outstanding, unique quilt!

Filed Under: Uncategorized

Beautiful Maple Leaf Quilt

May 20, 2017 by Marguerita

Bonnie Jenkins has sent me photos before of her quilts and here’s her newest and its story:


My husband and I visited the east coast of Canada last September, just in time to see the beautiful autumn leaves. I really loved the colours of the maple leaves. When we returned home I bought a copy of your book ‘Finish (almost) any quilt’ and was inspired to make a maple leaf quilt using your method. I found a maple leaf block on line and made the blocks but I didn’t put them on point as in your book.

I am so happy that it turned out so well and that I was able to complete it by myself. It is a gift for my brother Bill and his wife Dianne. Thank you so much for your help and the great tutorials on YouTube

You can read more about finishing almost any quilt with quilt-as-you-go here.

Filed Under: Finish Any Quilt, Quilt As You Go

  • « Go to Previous Page
  • Page 1
  • Page 2
  • Page 3
  • Page 4
  • Page 5
  • Interim pages omitted …
  • Page 34
  • Go to Next Page »

Primary Sidebar

If you need help with anything in any of our books, please email me and I’ll do my very best to help you. ~Marguerita  MMQuilts @ gmail.com

Alaskan Novels

Check out Inside Alaska for action-adventure stories about life on the water and in the small towns of Alaska and for Women’s Fiction and Romance, set in Southcentral Alaska.

T-Shirt Quilts – My Most Popular Book!

T-Shirts into quilts with quilt-as-you-go!

Finish (almost) Any Quilt

Marguerita guides you through the steps of taking your unfinished projects and easily converting them to quilt as you go.

Modern Quilt As You Go

Modern twist to block making with an updated quilt-as-you-go process.

Crazy Shortcake Quilts with 10″ Squares

It's a Layer Cake Quilt!

Sew & Quilt in Comfort

How to inexpensively create and arrange your quilting space to fit you perfectly and make machine quilting SO much easier!

Categories

  • Accessories
  • Books
  • Classes
  • comfort
  • Commercial Fishing
  • Cooking
  • Crazy Shortcake Quilt
  • Crazy Shortcut Quilts Book
  • Decorative Stitches
  • Ergonomics
  • Face Mask
  • Finish Any Quilt
  • Good Causes
  • Good Gauses
  • Granddaughter Audrey
  • Just for Fun
  • Meet …
  • Modern Quilt As You Go
  • Nice things
  • Our Book
  • Patterns
  • Playing Pool
  • Quilt As You Go
  • Quilting By Machine
  • quilting table
  • Quilts
  • Quilts in the works
  • Rabbits
  • Reading and Writing
  • Sarah Raffuse
  • Sewing and Quilting Tips
  • sewing and quilting videos
  • T-Shirt Quilts
  • The Frugal Quilter
  • The old house
  • Travel Alaska and more
  • Uncategorized
  • Wearables

Privacy Policy

Crazy Shortcut Quilts Website Privacy Policy

Copyright © 2026 · Dynamik-Gen on Genesis Framework · WordPress · Log in