My pal Judy Wedemeyer gets credit for this one and she’s going to post about it on her blog too 🙂
We were chatting about making quilted Art Cards and she wanted to show me some of the decorative bits she’d collected that she used to both make the cards and to give her inspiration. Colored feathers, beads, buttons, strings and more filled her little organizer bag. When I asked her about her bag, she flipped through it and told me how she’d made it from a tapestry book cover and some zippered food storage bags. I was in awe!
No amount of arm twisting could get her on camera but she did give me permission to share it all with you and so I’ll post the steps here, along with a video. I must say, I’ve made three of these so far, all as gifts, and I just LOVE them!
I started by scouring second hand shops for the tapestry book covers but could not find one in months of searching. I did, however, find a multitude of zippered bags, and a gift bag, and I’ve transformed several of them. I learned that it helps to have one of the plastic baggies with me while shopping, to check sizes of the zippered bags against the size of the plastic baggies. While it’s easy to shorten the depth of the plastic baggies, trimming the “zipper top” down was not something I wanted to do.

I look for the full zipper closure on the bags and the ones with two zipper heads are quite nice; I love a few extra interior pockets but they aren’t necessary, and I search both the “purses & bags” section and the luggage section of shops looking for likely candidates for this project.
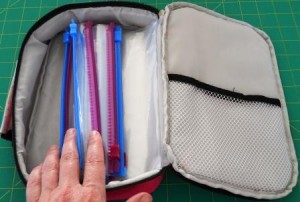
What’s absolutely necessary, for the way we make them, is some type of fabric spine (like a book spine) for sewing the baggies to.

Judy explained how she grouped the baggies for sewing (we both use 12 baggies per organizer) and offset the zipper tabs of the baggies, to reduce the bulk.

For most of the organizers I’ve made so far, I grouped the baggies by three, and stapled the bottoms of the bags together to keep them from slipping while I am sewing them. I backstitch at the beginning and end of each row of sewing the baggies in and I used a cotton wrapped polyester thread for strength, with a slightly longer stitch length than normal.

Supplies I’ve been using so far:
Zippered bag from second hand shops, laundered
Zipper pull plastic food storage bags
Strong thread
Stapler
Scissors to trim the excess off the bottoms of the baggies, if needed
Sewing Machine 🙂
Here’s the video – if it “hiccups” please press the Pause button and let the video fully buffer (watch the red line get longer, which indicates that the video is loading and buffering) and then press play.
Here’s another one that I made for my granddaughter:
Comments
3 responses to “5 Minute 5 Dollar Organizer”
I have been wanting to learn to quilt for ages. I have read extensively and have made some small things: paper pieced intricate pillow tops, a small nine-patch quilt in Japanese-flavored fabrics for my sister-in-law and brother-in-law for a wedding present. Now, I am interested in finding a machine which will quilt the tops I’ve made which are a bit larger. The problem for me, is that I don’t want someone else to quilt my work, nor do I want to pay for it at this point. I hope to grow into more creative, modern, artsy quilts.
Thank you so very much for this information because you addressed everything I’ve confronted in my research. Too large, too expensive, and perhaps unnecessary for what I want to do in my home. I will look into the midarm machine systems. Thanks for the tips. I already used the ironing board idea.
Hi Terri, I hope that you find a quilting system that you like and that you stay in touch! I too am exploring more of a “fresh, modern, artistic” look ~ I just love it!
Hi Dorothy,I have used a lot of Superior thread but not their 12wt vaegtiaerd so I can’t give you a direct comparison but their thread is not hand-dyed which, in my opinion, gives a more natural gradient of color. For instance, their yellow gradually turns into orange and gradually into red rather than having one inch of yellow, followed by an inch of orange, and then a inch of red. I also like the luster of the hand-dyed thread as well as the fact that it is colorfast.